Biamp Conferencing Rooms - An Audio Installer's Dream
Posted on: 17th July 2023
Biamp’s Conference Room Designer is their comprehensive and intuitive meeting room designer designed to help installers and users spec out and configure rooms from the smallest huddle room to large open board rooms. To show you just how easy it is to setup a meeting room we have created these 5 simple steps you can follow to take you from start to a completed and fully specced meeting room with Biamp.
Biamp Conference Room Designer
Step 1 – Measure your Room
To start with you’ll need to know the size of your new meeting room. You’ll need to know; the room dimensions, the size and shape of the table in the room, or any other furniture, and the ceiling tile type. It might also be useful to record the room acoustics to test the noise floor as well as the Reverb Time, you’ll need this later. Once you have these things, you’re ready to go to Biamp’s Conference Room Designer.
If you're completely new to Biamp's Conference Room Designer check out our full walkthrough taking you from start to finish.
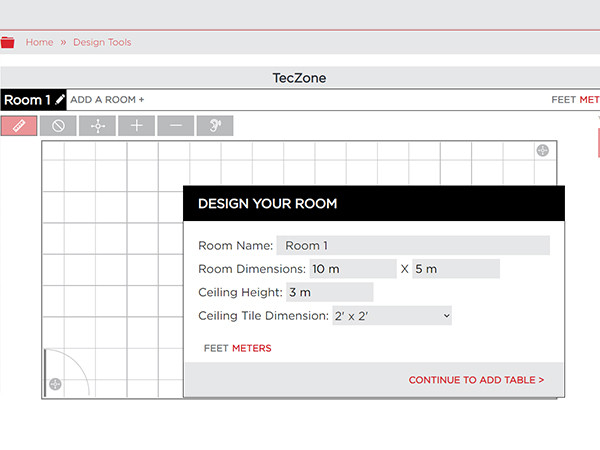
Step 2 – Add the room details to Conference Room Designer
Once you’re on the Biamp Conference Room Designer you’ll need to fill in all relevant information to your project including the name as well as the dimensions of your room. You’ll also have the option to pick the style of microphone you would like. This is also where you’ll need to add the room acoustics, rated from “Poor” to “Perfect”, if you’re not sure what your room should be rated at then check out Biamp’s helpful guide for room acoustics here.
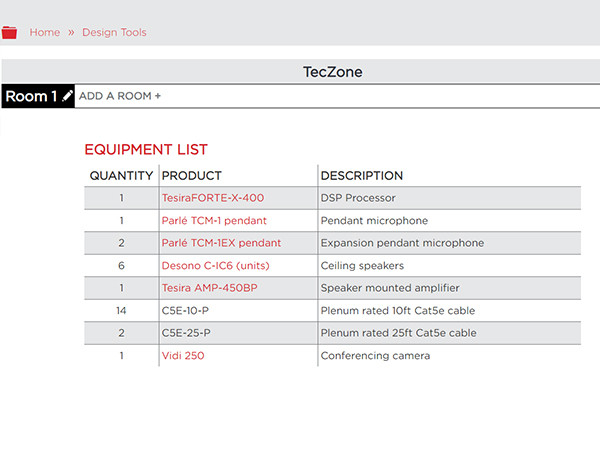
Step 3 – Buy your specced Biamp Bundle
Once you're all finished speccing out the room, you’ll notice an equipment list. This will tell everything you’ll need to create the meeting room you have designed. Depending on your room this list can range from a variety of individual products or if it is suitable, one of Biamp’s pre-existing Meeting Room Bundles (MRB). You can check out Biamp’s full range of meeting bundles on our trade website here.
If you’re not happy with the equipment list you have been given then all you need to do is simply reset the Conference Room Designer and either reduce or increase the coverage of your system.
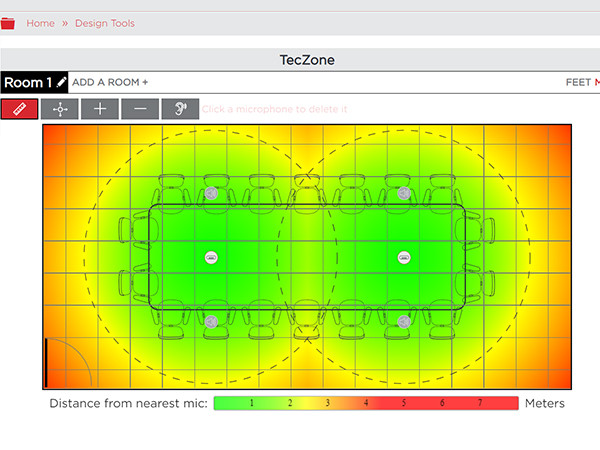
Step 4 – Install your system
Now we’re not going to tell you how to install your system (because we know how good you are!), but we would recommend that you do follow the layout shown in the designer as this will ensure that you can optimise your coverage!
Step 5 – Biamp Launch Process
Biamp launch is a feature found in TesiraFORTÉ X and Devio SCX conferencing devices that measures the acoustics of your space, setting up a custom DSP for each component automatically and ensuring the system is correctly tuned. All you’ll need to do to use this feature is make sure your system is installed, then click the launch button on your unit and the system will do the work for you. This feature massively cuts down set up time from hours to minutes and removes the need of hiring an audio engineer. If you’d like to know more about Biamp Launch, check out our video below.
And that's just about it, now you have a completed Biamp conferencing room! If you'd like to know more about Biamps range of Conferencing Systems contact our team now on 01525 850085.
Related Blogs
Biamp's Meeting Room Bundles are Microsoft Teams Certificated